How To Take Your Initial Language Assessment
If you closed the initial Language assessment prompt when logging in for the first time and want to take it now,
- Log into your Managing account
- Click the Take The Assessment link in the blue banner at the top
*For accounts with more than one learner: Use the learner selector dropdown to select which learner you want to assess.
3. After clicking take the assessment, the assessment will start.

How To Reassess Your Learner's Level In The Language Pyramid
To check to see if your learner is ready to move onto the next level, you can take the reassessment by following the instructions below.
- Log in with your Managing account
- Use the learner selection dropdown to select the learner you wish to reassess
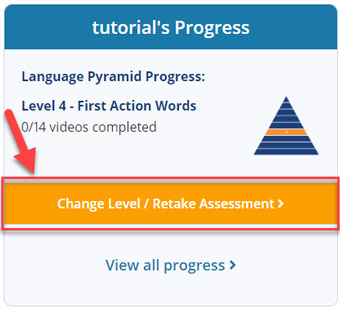
- Click the Change Level / Retake Assessment button in the progress widget
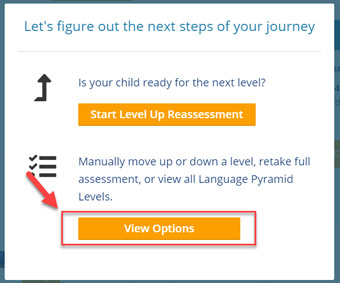
- Click the Start Level Up Reassessment button

If you are on Level 2 or above, you can also go back to the previous level by following the instructions below.
- Log in with your Managing account
- Use the learner selection dropdown to select the learner you wish to reassess
- Click the Change Level / Retake Assessment button in the progress widget
- Click the View Options button
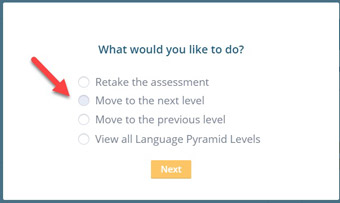
- Select Move to the previous level and click Next to be taken to the previous level

If you are on Level 8 or below, you can also go up to the next level without retaking the assessment by following the instructions below:
- Log in with your Managing account
- Use the learner selection dropdown to select the learner you wish to reassess
- Click the Change Level / Retake Assessment button in the progress widget
- Click the View Options button
- Select Move to the next level and click Next to be taken to the next level

You can retake the entire assessment all over again by following the instructions below:
- Log in with your Managing account
- Use the learner selection dropdown to select the learner you wish to reassess
- Click the Change Level / Retake Assessment button in the progress widget
- Click the View Options button
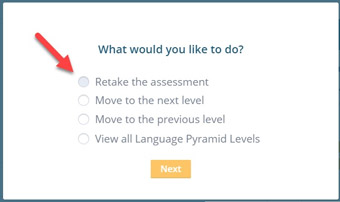
- Select Retake the assessment and click Next


How To Assign A Gemiini Video
- Log in with your Managing account
- Click the QuickStart Videos navigation button
- Click the button for either Language Pyramid, Skills, or Reading videos
- Click the View all videos button for the desired level or group
- Click the Assign & Play button
- Enter how many times you want your learner to watch this video
- If you have multiple connected learners, click the checkbox next to each learner you want to receive this assignment
- Click the Send Assignment button

How To Archive And Delete An Assignment
- Log in with your Managing account
- Click the archive icon in the lower right of any assignment
- Click the Archive button in the confirmation prompt
Once an assignment has been archived it can be deleted by:
- Click the Assignment Archive button
- Click the trash can icon
- Click the Delete button in the confirmation prompt
Alternatively, you can reactivate an archived assignment by:
- Click the Assignment Archive button
- Click the reactivate icon for the desired assignment
- Click the Activate button in the confirmation prompt

How To Edit A Video Assignment
- Log into the website with your Managing account
- Scroll to the assignment you wish to edit
- Click the pencil in the lower right of the assignment
- Make the changes you wish to perform
- Click the Save button
- Click No to preserve the progress you've made with this assignment or click Yes to remove all progress made with this assignment.
Note: Because assignments can be made from more than just videos (EX: Working Memory), there are a few things to keep in mind.
- You CANNOT share assignments with other users
- You CAN share videos and personal clips
- Any edits made to the video in My Videos does NOT update the learner's assignment.
- Any edits made to the learner's assignment does NOT update the corresponding video in My Videos that the assignment came from.

How To Create A Custom Video
- Log in with a Managing account
- Click the My Videos navigation button
- Click the Build New Video button
- Use the filters and search options to find the clips you want
- Click the Add button for any clips you wish to include
- Give your video a title
- Click either the Save/Assign button or the Save button
Note: You can stop building midway and your changes will be saved in a draft until you click either the Save/Assign or Save buttons. The draft will load automatically the next time you click the Build New Video button.

How To Customize A Gemiini Video
- Log in with your Managing account
- Click the QuickStart Videos navigation button
- Click the button for either Language Pyramid, Skills, or Reading videos
- Click the View all videos button for the desired level or group
- Click the Customize button
- Rearrange, duplicate, or remove the existing clips from the chosen video and click Next
- Add additional clips based on the level or group that video belongs to* and click Next
- Add "Fun with Gemiini" clips* if your learner needs help staying engaged and click Next
- Give your video a title
- Click either the Save/Assign button or the Save button
Note: If you wish to add clips found outside the level or section you are customizing, you can open the Advanced options menu and turn on Use complete library to gain access to all the clips found in the Gemiini library.

How To Assign A Custom Video
- Log in with your Managing account
- Click on the My Videos navigation button
- Click the Assign button
- Enter the number of repetitions you want your learner to watch this video
- If you have multiple connected learners, click the checkbox next to each learner you want to receive this assignment
- Click the Send Assignment button

How To Edit A Custom Video
- Log in with your Managing account
- Click on the My Videos navigation button
- Click the ••• button for the video you want to edit
- Click the Edit option from the menu
-OR-
Click the Duplicate option from the menu to preserve the original video and create a copy of the existing video that you will then make changes to - After making the desired changes click either the Save/Assign button or the Save button
Note: You can stop editing midway and your changes will be saved in a draft until you click either the Revert to Original, Save/Assign, or Save buttons. The draft will load automatically the next time you edit that video.

How To Delete A Custom Video
- Log in with your Managing account
- Click the My Videos navigation button
- Click the ••• button for the video you want to delete, and click the Delete option from the menu
-OR-
Check the box for each custom video you wish to delete, select the Delete option found in the Action dropdown, and click the Submit button - Click the Delete button in the confirmation prompt

How To Upload Personal Clips
- Log into the website with your Managing account
- Click the My Videos navigation button
- Click the My Clips tab
- Click the Upload New Clip button
- Enter a name for your clip
- Click the Browse button to find the file you wish to upload
- Click the Submit button and the progress bar will fill to 100%
- Once you receive the Submission Complete message click the Ok button
Note: Clips must be approved by Gemiini before they can be added to videos. You will receive an email within 2 business days confirming the status of your clip. Copyrighted or offensive material will not be approved.
Note: Clips must be less than 100 MB in size. (Typically under 45-60 seconds if filmed with a cell phone or tablet)
Once your personal clips have been approved, you can add them to any video or assignment by clicking the My Clips box found inside the video builder.

How To Delete Personal Clips
- Log in with your Managing account
- Click the My Videos navigation button
- Click the My Clips tab
- Click the ••• button for the clip you wish to delete, and click the Delete option from the menu
-OR-
Check the box for each custom clip you wish to delete, select the Delete option found in the Action dropdown, and click the Submit button - Click the Delete button in the confirmation prompt
Note: Deleting a custom clip will remove it from all videos that it has been added to.

How To Share A Video With A Friend
- Log in with your Managing account
- Click the My Videos navigation button
- Click the ••• button and click the Share with Friend menu option
-OR-
Check the box for each video you wish to share, select the Share option found in the Action dropdown that appears below, and click the Submit button - Check the box for each friend or group you'd like to share with along with the Terms and Conditions box
- Click the Share Now button

How To Share A Clip With A Friend
- Log in with your Managing account
- Click the My Videos navigation button
- Click the My Clips tab
- Click the ••• button and select Share with Friend
-OR-
Check the box for multiple videos, select the Share option found in the Action dropdown that appears below, and click the Submit button - Check the box for each friend or group you'd like to share with along with the Terms and Conditions box
- Click the Share Now button

How To Manage Shared Videos or Clips
- Log in with your Managing account
- Click the My Videos navigation button
- Click the Shared tab
From here you can manage shares that you have received, sent, or declined:
- Tabs - Use the tabs to switch between Inbox, Sent, and Declined to see which shares you have received, sent, or declined respectively
- Word Count - Click the link to see the titles of the clips present in the video that was shared with you
- Preview button - Click this button to watch a preview of the video or clip that has been shared with you
- Add to My Videos/Clips - Click this button to save a copy of this shared video or clip to your account
- Decline - Click this button to decline the shared video or clip. If you change your mind and want to accept it later you can do so from the Declined tab
- Bulk Action Dropdown - If you select multiple videos or clips you can add them to your account or decline them all at once

How To Revoke A Share You've Sent
- Log in with your Managing account
- Click the My Videos navigation button
- Click the Shared tab
- Click the Sent side tab
- Click the Void Share button
- Click the Void button in the confirmation

How To Add An Image For Personal Clips
- Log into the website with your Managing account
- Click the My Videos navigation button
- Click the My Clips tab
- Click the + Add button
- Navigate to any point in your clip to capture and
save an image
- Click the Capture Image button
- Click the Save Image button
Note: The image is primarily used for EXPRESSIVE TESTING.
Note: The image will be used as the assignment thumbnail image if the custom clip is the first clip in the video for the assignment.